Lets Start

Welcome to ReaSonus Native documentation
The documentation should guide you through the functionalities of ReaSonus Native. The first part is about installation and settings
The second part will explain all the functionalities available via the ReaSonus Control Panel.
Then the nitty gritty about all the controls available on the FaderPort will be explained.
The last part is about some of the additional functionalities, actions, etc.
If one of the screenshots is not as clear as you would like, open it in real life. Nothing as good as the real deal
Will be appreciated
ReaSonus Native is a free and open source project, but takes some time and effort to create and maintain. It is not required of course but a donation for maintaining would be highly appreciated. This will, for example, be used for maintaining the Windows version, because I do not own a Windows machine.
The big Thanx
This project would not have been possible without you, reading this. But also a big thanx goes to the following people:
- Geoff Waddington, The man behind the impressive CSI. Without the CSI project, this would probably never been created.
- Cfillion, for helping me out with some annoyances I ran into with C++ and CMake.
- DesertEagleDerek, For the code, input and discussions.
- All volunteers helping with testing, reviewing the documentation and being patient.
Installation
Before you start
ReaSonus Native has the following dependencies:
- SWS: If you have not installed it yet, you can download it from the SWS website
- ReaImGui: This is an extension needed for all the Dialogs
Both of these extensions can, as ReaSonus Native be installed with ReaPack
Your FaderPort should be in Studio One mode. You can check the manual for more info about how to do this.
Also be sure both the MIDI input as the output for the FaderPort should be set to disabled in the REAPER settings.
ReaPack
By far the easiest and recommended way to install ReaSonus Native is via ReaPack. ReaSonus Native is in the ReaTeam Extensions, so can be installed instant
In REAPER open ReaPack, search for 'ReaSonus'. Select 'ReaSonus Native' and install it.
Manual installation
For manual install ReaSonus Native you have to download the latest version and move it to the correct folder. This way of installing ReaSonus Native can be needed for testing pre releases etc
- Download ReaSonus Native for your platform from Github
-
On this page there is also a file names
en-US.ini, this is needed as it keeps all the translations for the ReaSonus Native Control Panel -
In Reaper, go to
Options->Show REAPER resource in Explorer/Finder. This will open the folder with all the REAPER files. -
In this folder, open the
UserPluginsfolder and copy the downloaded ReaSonus extension to the folder. -
In here also create a new folder named
ReaSonusand copy/move theen-US.inifile into this folder
Nice Extras
REAPER does not reinitialize midi devices when they get activated with REAPER already running. You can in that case open the preferences, open the settings page of ReaSonus Native under Control/OSC/Web and close it again.
To make this a bit easier you could add another extension named reaper_automidireset.
This performs the reset automatically in the background. More info here on the Forum
Settings
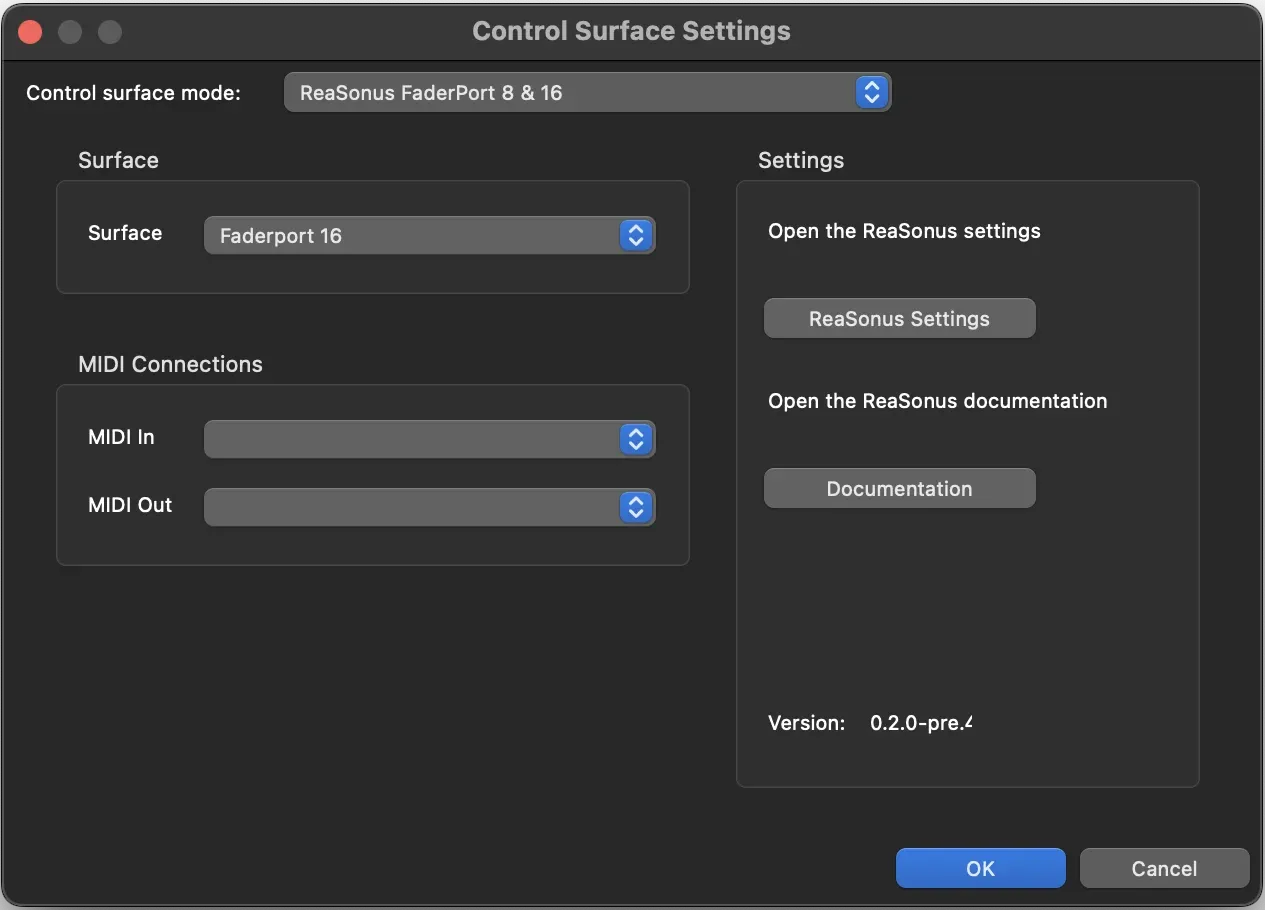
After installation you have to change some settings to make it work. The screenshot is for the FaderPort 8/16. The only difference with the FaderPort v2 version is the Surface Select.
Select the device you want to install it for below.
First of all you should select the correct Control surface mode. Select ReaSonus FaderPort 8 & 16 the settings as displayed in the image should appear:
- Surface: Select your controller here.
- MIDI In: Select the proper MIDI Input
- MIDI Out: Select the proper MIDI Input
On the right side you have 2 buttons:
- Documentations: Opens this website in your default browser
On-Device Menu
By pressing [Left Shift] + Touch-button on the FaderPort, you will be able to make all those settings on the device as well.
First of all you should select the correct Control surface mode. Select ReaSonus FaderPort V2 the settings as displayed in the image should appear:
- MIDI In: Select the proper MIDI Input
- MIDI Out: Select the proper MIDI Input
On the right side you have 2 buttons:
- Documentations: Opens this website in your default browser