Settings
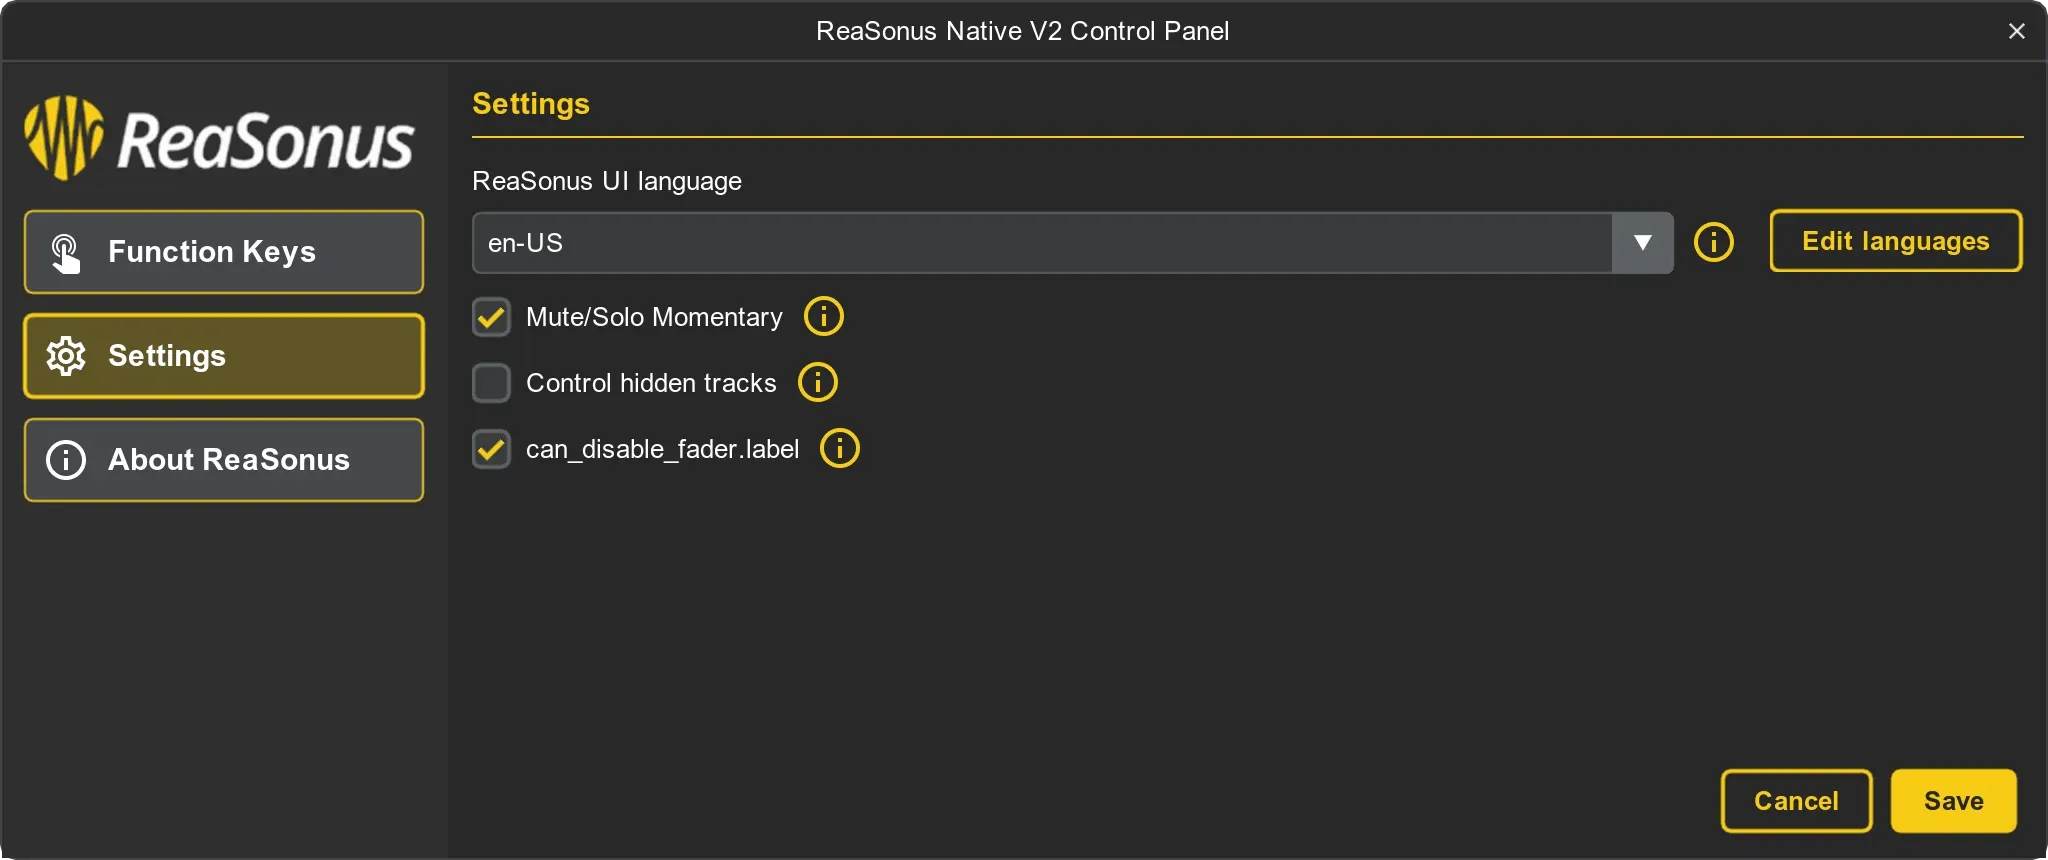
For the FaderPort v2 ReaSonus Native has the following 2 settings
- Mute/Solo momentary: When set, it will make the Solo and Mute buttons momentary. The timeout for being momentary is 500 milli seconds. In short: If you press the solo button longer then 500ms and release it, it will instant unsolo again
- Control hidden MCP tracks: By default ReaSonus Native will step through the visible tracks. With this option also the hidden files in the MCP will be selectable
- Enable option to disable fader move when selecting tracks: This option makes it possible to use [Shift] + [Channel] to disable fader moves when selecting tracks in REAPER
- Enable endless track scrolling: When on the last track and clicking the next button, go to the first track. Same for previous, but then the other way around.
- Enable write action for Latch Preview mode automation: Enable the posibilty to trigger a write action when engaging the Latch Preview (Pan) button when in Latch Preview mode
- Write action for Latch Preview mode automation: Action triggered when engaging the Latch Preview button when in Latch Preview automation mode
Track

The FaderPort V2 has a single fader that is mostly used for the selected track. 7 of the top 8 buttons controll theh selected track.
- Solo:
- Default: Isolates the selected Track output signal in the mix.
- Long Press: Holding the Solo button for longer then half a second makes the button momentary. This means that after releasing the button after that half a second, the value will go to the previous value after release. This can be helpfull for quickly checking a track soloed.
- Shift: Unsolo all the soloed tracks.
- Mute:
- Default: Mutes the selected Track output signal.
- Long Press: Holding the Mute button for longer then half a second makes the button momentary. This means that after releasing the button after that half a second, the value will go to the previous value after release. This can be helpfull for quickly checking with the track muted.
- Shift: Unmute all the muted tracks.
- Arm:
- Default: Arm the selected Track for recording.
- Shift: Toggle Arm all tracks for recording.
- Shift: Speaks for itself I hope. By default this is a momentary button. When clicking/release quick the Shift stays engaged
- Bypass:
- Default: Toggle Bypass all the effects for the selected track.
- Shift: Toggle Bypass all the effects for all tracks.
- Touch:
- Default: Engages Touch Automation for the selected track.
- Shift: Engages Latch Automation for the selected track.
- Write:
- Default: Engages Write Automation for the selected track.
- Shift: Engages Trim Automation for the selected track.
- Read:
- Default: Engages Read Automation for the selected track.
- Shift: Engages Latch Preview Automation for the selected track.
Momentary Mute/Solo
Making the Mute and Solo momentary is a setting. In REAPER go to the Preferences pane, select Control/OSC/web and double click the ReaSonus FaderPort V2
Toggle the check box named Mute/Solo Momentary
Transport
- Stop: Stops playback.
- Loop: Engages / disengages Looping
- Play / Pause: Starts playback at the current playback- cursor position. Press again to pause playback.
- Rewind:
- Default: Rewinds in a slow pace. You can toggle the speed by pressing the button. All the other keys will stop the rewind
- Shift: Go to the start of the project
- Fast Forward:
- Default: Fast Forwards in a slow pace. You can toggle the speed by pressing the button. All the other keys will stop the Fast Forward
- Shift: Go to the end of the project
- Record: Press to start recording at the current playback-cursor position for record-enabled tracks.
Session Navigator

The Session Navigator provides quick navigation and session controlls. Buttons 2 till 8 alters the functions of the push-button encoder and the Previous (Undo) and Next (Redo) buttons on either side.
Pressing Shift + Undo will Undo the last action and pressing Shift + Redo will Redo the last action in most of the cases, unless otherwise stated below.
Pressing Shift + Encoder click will save the project in some of the cases, unless otherwise stated below.
- Link: The previous, next and encoder will keep the last function.
- Default: The odd one of the list. This one toggle the Last Touched FX Param mode. This will enable you to controll the last touched FX parameter with the fader for creating better automation envelopes.
- Shift: Toggle following the cursor while playing
- Master: In master mode the Fader controlls the master volume and the encoder is used for panning
- Previous: Select the previous track.
- Encoder:
- Default: Set the pan, or left pan for the master track
- Shift: Set the width, or right pan for the master track
- Encoder Click:
- Default: Set the pan, or left pan to the center value
- Shift: Set the width, or right pan to the center value
- Next: Select the next track.
- Pan: Read more on pan modes below
- Previous: Select the previous track.
- Encoder:
- Default: Set the pan, or left pan for the selected track
- Shift: Set the width, or right pan for the selected track
- Encoder Click:
- Default: Set the pan, or left pan to the center value
- Shift: Set the width, or right pan to the center value
- Next: Select the next track.
- Click: Handle the different metronome functions
- Previous: Set metronome speed to 1x
- Encoder: Adjust the Metronome volume
- Encoder Click:
- Default: Toggle metronome on/off
- Shift: Show metronome/pre-roll settings
- Next: Set metronome speed to 2x
- Channel: Control channel scrolling. The button will have the track color.
- Previous: Select the previous track. If the current track is the first track, the last track wil get selected
- Encoder:
- Default: Moves the faderbank by steps of 1 track
- Encoder Click: Not implemented
- Next: Select the next track. If the current track is the last track, the first track wil get selected
- Section: Handle adding, deleting and editing regions. Pressing this button wile in the Section mode, will open the edit Region window
- Previous:
- Default: Goto/select previous marker/region
- Shift: Set the start point for a new section
- Encoder:
- Default: Move edit cursor forward/backward one beat
- Shift: Move cursor left/right one pixel
- Encoder Click:
- Default: Insert region from time selection and edit...
- Shift: Delete region near cursor
- Next:
- Default: Goto/select next marker/region
- Shift: Set the end point for a new section
- Scroll: Handle scrolling the navigator in Reaper
- Previous:
- Default: Scroll Reaper up
- Shift: Scroll Reaper left
- Encoder:
- Default: Scroll Reaper up/down
- Shift: Scroll Reaper left/right
- Encoder Click:
- Default: Vertical scroll selected tracks into view
- Shift: Horizontal scroll to put play cursor at 50%
- Next:
- Default: Scroll Reaper down
- Shift: Scroll Reaper right
- Marker: Handle adding, deleting and editing markers. Pressing this button wile in the Marker mode, will add a marker at the current position
- Previous: Goto/select previous marker/region
- Encoder:
- Default: Move edit cursor forward/backward one beat
- Shift: Move cursor left/right one pixel
- Encoder Click:
- Default: Insert and/or edit marker at current position
- Shift: Delete marker near cursor
- Next: Goto/select next marker/region
Alternative functionality
- Zoom (Shift+Scroll): Handle zooming the navigator in Reaper
- Previous:
- Default: Zoom Reaper out horizontal
- Shift: Zoom Reaper out vertical
- Encoder:
- Default: Zoom Reaper in/out horizontal
- Shift: Zoom Reaper in/out vertical
- Encoder Click:
- Default: Toggle track zoom to minimum height
- Shift: Toggle track zoom to maximum height
- Next:
- Default: Zoom Reaper in horizontal
- Shift: Zoom Reaper in vertical
- Flip (Shift+Pan): Toggle the Filter Management window
- Lock (Shift+Channel): When the setting Enable option to disable fader move when selecting tracks is enabled this will toggle the actual disabling of the fader
Pan values
Reaper has 3 pan modes. Depending on the choosen mode, there are 1 or 2 pan values.
- Stereo Balance/Mono Pan: This is the default and in REAPER you'll see only one pan knob/fader. In this mode Pan Value 2 has no function
- Stereo Pan: This mode has 2 values. Pan Value 1 is for Left/Right panning and Pan Value 2 for the width
- Dual Pan: This mode has 2 values. Pan Value 1 is for Left panning value and Pan Value 2 for the right panning value
The last will show 2 knobs/faders in REAPER for panning. You can find more info about the Panning Modes in the REAPER documentation
Function Control

The bottom row of the eight buttons also gives you acces to configurable functions by pressing the Shift buttons together with these buttons
The functions can be changed as described in below.
- F1: Custom function (user defined)
- F2: Custom function (user defined)
- F3: Custom function (user defined)
- F4: Custom function (user defined)
Managing the functions
ReaSonus Native has a user interface for managing your Functions. More info about how to manage the Functions can be found here: Functions Management.