Functions Management

Within ReaSonus Native it is fairly simple to manage the actions attached to the function buttons. To open the window click the [Left Shift] + [Macro]-button, or open the ReaSonus Native Control Panel and select the Function Keys tab.
There are 2 tabs with 8 fields for the function keys on the FaderPort 8/16 and there are 4 functions keys for the FaderPort V2.
The third tab is for the footswitch with function blocks to assign actions to Default Footswitch, [Left Shift] + Footswitch and [Right Shift] + Footswitch
Each function block shows the name and info for the corresponding action, together with the action id.
There are 2 buttons per block available:
- The magnifying glass: Opens the action list. You can select the action you want and then press the select button.
- The refresh button: This will clear the selected action.
Click the Save button to save your changes.
Plugin Mapping
There are multiple ways of managing the mapping of plugin parameters. By far the easiest will be via MIDI Learn. You can also use the UI, which gives you the option to change parameter names, step number, and so on. This requires changing the mapping files by hand.
This is a FaderPort 8/16 only functionality
New Plugin Mapping
The idea about the MIDI Learn method is to make the mapping as simple as possible. When in the Plugin Channel Mode:
- Press the [Solo] button to open the window of that plugin.
- Press the [Link] button will open the editing mode. If no mapping has been done for the selected plugin, a new mapping will be created automaticaly. In this mode the button is blinking.
Now a configuration file gets created in the background and the linking is started. All displays should have 2 lines with the text Free in it.
Now you can wiggle/touch a parameter in the plugin and then press the [Select] button of the channel you want to assign it to or touch the fader of choice. This should change the text Free to the name of the parameter (The top one for the select button and the bottom one for the fader).
The [Select] button can be used for toggle buttons (on/off) or plugin parameters with a limited amount of steps. In that case, when the correct data is available from the plugin, pressing the [Select] button will loop through the options
If all channels are populated (or earlier) you can use the Pan/Param encoder to scroll to a next set of empty slots
If you want to disconnect an assignment, you can press the Right Shift and press the Select button or touch the fader you want to disconnect. The connection is removed and the text will change to Free again.
Once done editing, press thge [Link] button again. Now you can use your mapping instantly
Edit Mapping
If the selected plugin already has a mapping, this will get activated instantly. If you want to make changes to the mapping, press the [Link] button. This will enable the edit mode. All values should be cleared from the displays and the empty slots will display the Empty text again.
If you want to overwrite a mapping, just wiggle/touch a plugin parameter and then select the control you want to assign it to. This will overwrite it
Overwriting names
It is also possible to overwrite parameter names. Check the Ui tab for this.
It is at this point not possible to add mappings in the ReaSonus Control Panel
Within ReaSonus it is also possible to manually add a mapping or to edit some settings of the mapping. If you want to use this, do one of the following:
- Go into the learn mode. In this mode, press the [Left Shift] and press the [Select] button of the channel you want to edit. This opens the Plugin Mapping with the current effect and parameter selected.
- Open the ReaSonus Control Panel and open the tab Plugin Mapping. Then you can select the developer and the plugin you want to edit.
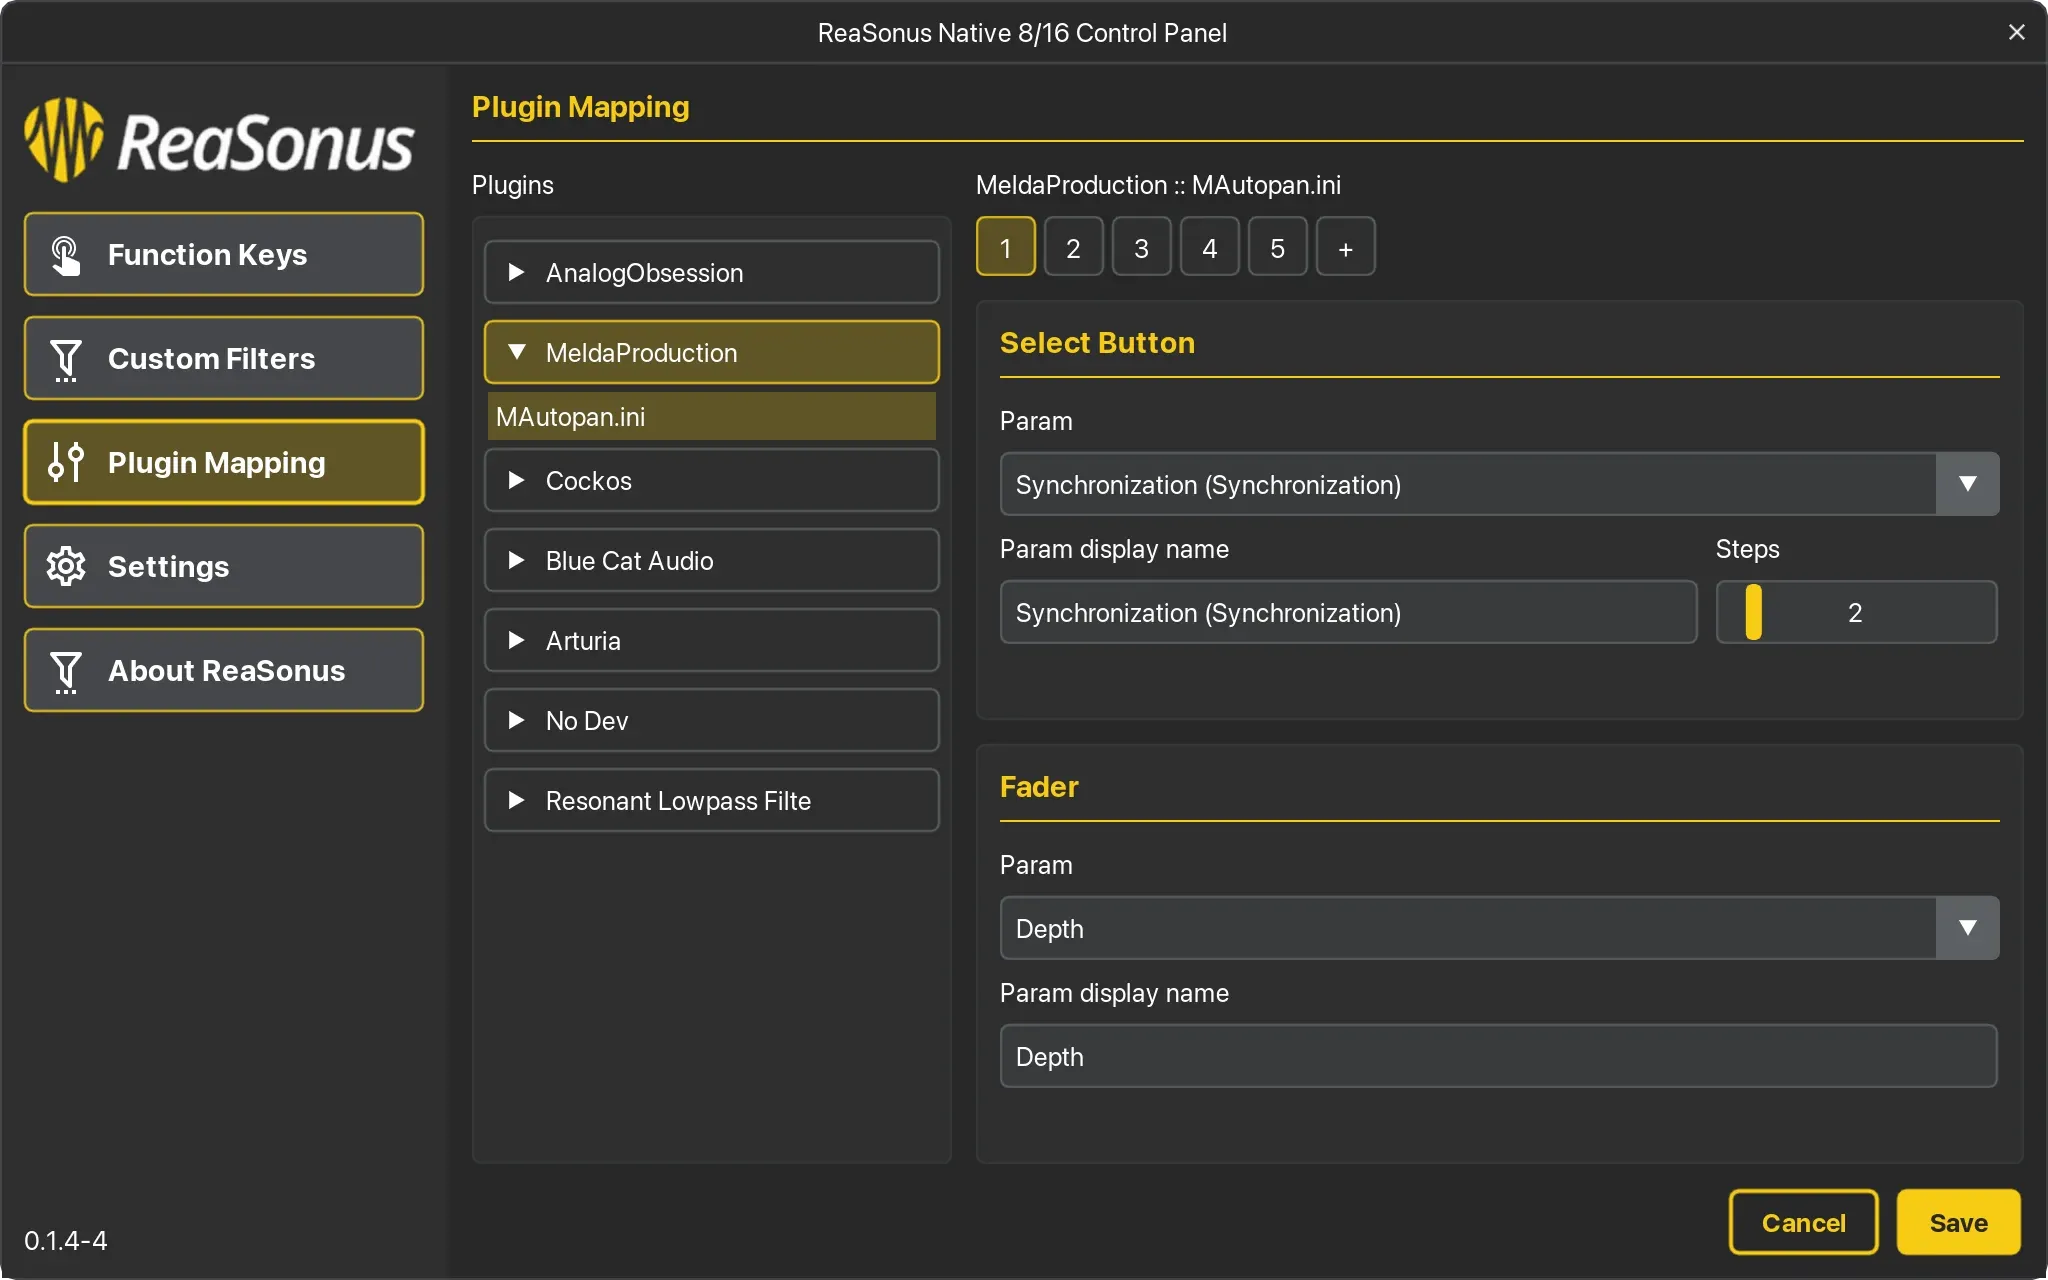
The panel
On the left side you see the list of plugins which are already mapped. They are gouped by developer to make searching a bit easier.
On the right side at the top you see a list with numbered buttons. These represent the tracks you assign the controls to. When the list gets larger you can scroll through the list. Clicking a button will show you the settings for that track.
The topbar

The topbar displays the number of edited groups and the total number of groups. Beside that info there are a couple of buttons to make your live easier:
- Go To Group: When clicking this button a little popup appears with an input field. You can enter the group number here to go quickly go to that group. When using the Enter or Escape key the popup disappears.
- Undo: Undo the changes of the currently selected group. If you want to undo all changes, use the Cancel button in the bottom of the page.
- Add: Add a new group after the currently selected group.
- Delete: Delete the currently selected group.
Navigation

Navigate through the groups. Select the group you want to edit, or use the previous and next buttons to step through the groups.
When using the Left Shift key of your keyboard and clicking the previous or next button, you will step with 13 groups. This makes it easier to step faster through teh groups when the plugin has a lot of groups.
If you want to re-order them, you can drag and drop the groups.
Select

- Plugin Parameter: This is a popup with all the available parameters of the selected plugin with a search field. This makes iti easier to find a parameter when there are a lot of parameters.
- Parameter Display Name: A configurable name for the parameter. This can come in handy as most times the original names are fairly long.
- Number of Steps: (Select only) the numbe rof steps/options for the parameter. In case of on/off this will be 2
- Label style: Set the label style for the parameter label in the display to inverted or not inverted. This can help you organize your mappings a bit.
Fader

- Plugin Parameter: This is a popup with all the available parameters of the selected plugin with a search field. This makes iti easier to find a parameter when there are a lot of parameters.
- Parameter Display Name: A configurable name for the parameter. This can come in handy as most times the original names are fairly long.
- Label style: Set the label style for the parameter label in the display to inverted or not inverted. This can help you organize your mappings a bit.
Filters Management
ReaSonus Native has the ability to create and manage your own track filters. The filters are based on file names with additional options. To open the window click the Macro-button. Or select the Custom Filters tab in the ReaSonus Control Panel.
Don't forget to click the save button when you're done editing.
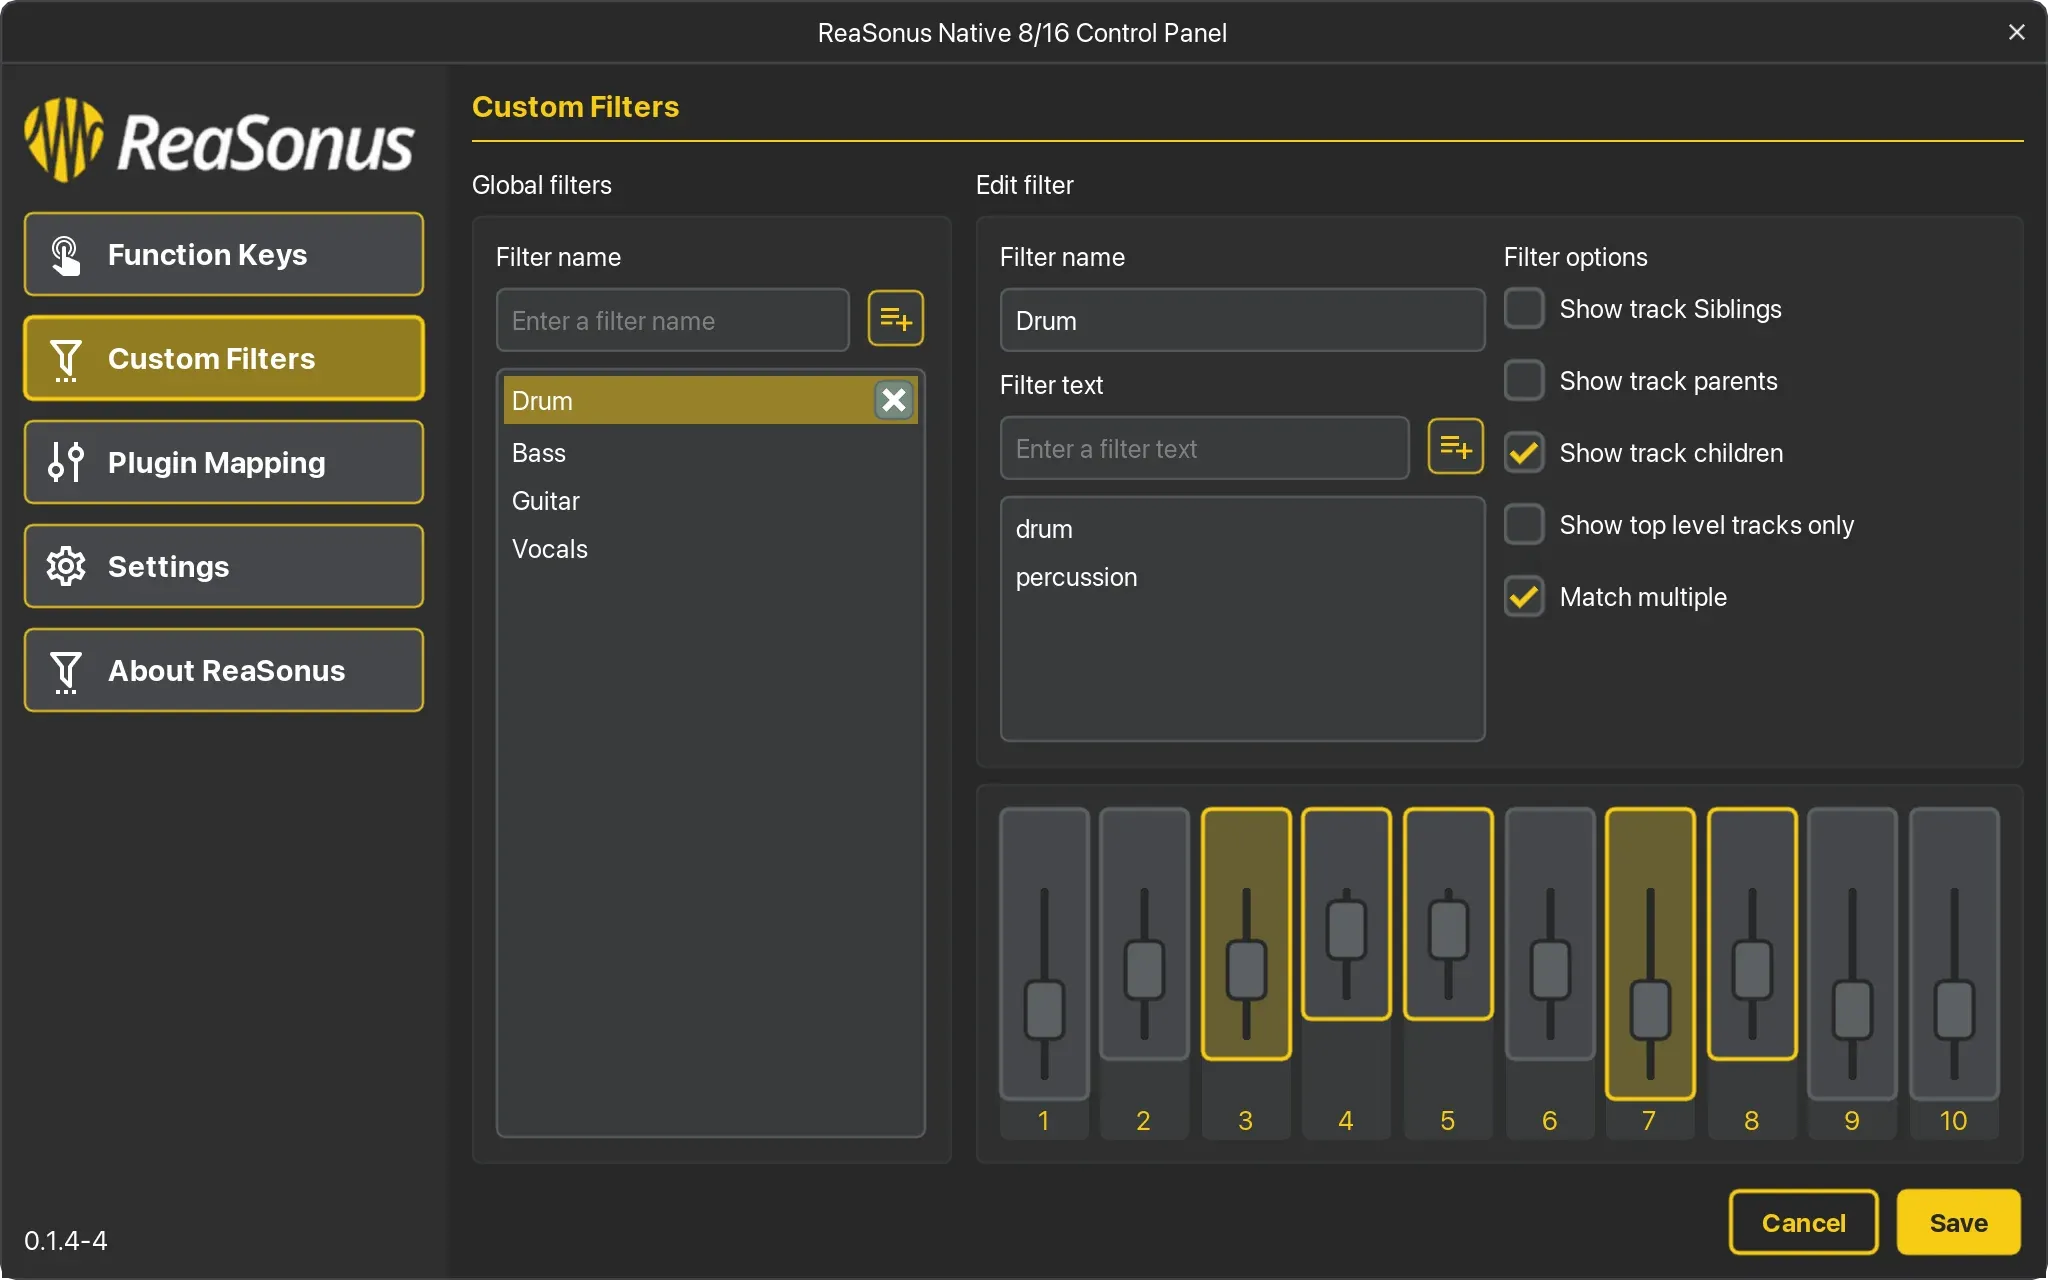
Adding and removing filters
The left side of the window contains the list with available filters. If you want to delete a filter, select the filter in the list and click the 'X' button on the right
Adding a new filter is as simple as deleting one. Enter a name in the input field above the list and click the '+' button.
The order of the filters on the FaderPort is the same order as they appear in the list. You can change the order by dragging and dropping the items.
The Filter Options
The first match the filter makes is by name. If no name is provided, no tracks will be visible by selecting that filter. After the name the filter is checking by the given options.
- Filter name: The name of the filter. This will be the name used in the list on the left side and in the displays of the controller.
- Filter text: Adding a text can be done by entering it in the input field and click the 'plus' button. Removing an item can be done by selecting it and clicking the 'X' button on the right.
- Case Insensitive search: Search case insensitive
- Show track siblings: Show all the sibbling tracks of matching tracks
- Show track parents: Show all parent tracks of matching tracks
- Show track children: Show all the child tracks of matching tracks
- Show only top level tracks: Shows only the filtered tracks if they are top-level
- Match multiple: By default the names wil only match the first item. Enabling this option will show all matches
The 'Preview'
There is a 'Preview' available that represents your settings. The 2 channels with the dark-yellow background represent tracks that match the name. The ones with the bright yellow border will be the ones that will be visible after using the filter.
This 'Preview' should help you a bit with understanding the effect of the different filter options and how they interact with eachother
Using your own filters
To use your own filters press [Left Shift] + All. This will show all your self created filters in the displays. If you have created more then 8/16 filters, use the pan encoder to scroll to the next filters.

If there is a filter available press the Select-button to select the filter. The All-button will now be yellow.
If no filter is available, the display tells you so. Pressing the select button then will ask you if you want to open the Filter Management window.
Translations Editor
Within Reasonus Native it is possible to manage languages and translations.
Add Language
- Open the Reasonus Native Translations Editor via:
- Actions List: Search for
translationsand select the proper action - Open the Settings Page in the ReaSonus Native Control panel
- Enter a name for the new language. It is recommanded to follow the next convention:
-
The first 2 letters are for the language like
en,nl,fr, in lower case - The second 2 letters will be the country like
CA,DE, etc - Connevct these with a dash like:
en-US,fr-CA - Click the add icon next to the input field. A new file for your language is created and populated with the en-US translations
- Now you can edit the translations to your liking and sasve the changes
- After editing the changes you can go to the Settings Page in the Control Panel
- Select your language and click Save
Contribute
For now, only en-US will be shipped with ReaSonus Native. If you think your language should get added to the ReaSonus Native install, please contact me. When doing that, please keep in mind that I will ask you for updates to the file when changes are needed, so it not a one-of.
How do updates work
A little bit of technical background:
-
When updated with ReaPack the new
en-UStranslation file will get installed in the/UserPlugins/ReaSonus - On startup of REAPER the current en-US file will get overwritten with the new one.
- All other language files will get updated with the newly added translations. (current translations will off course stay as they are)
- You can now update the newly added translations to the language you want
ReaSonus Actions
With ReaSonus Native also some actions get installed. These are internally also used in the extension, but if you want one or more of them as a menu button, you can.
These actions apply to all the devices.
Reasonus: Toggle follow the play cursor
Toggle Follow the play cursor. This action has a state, so should reflect its state in the button
ID: REASONUS_TOGGLE_PLAY_CURSOR_COMMAND
Reasonus: Show Reaper resource path
Shows the Reaper Resource folder location in a console so you can easily copy it
ID: REASONUS_SHOW_REAPER_RESOURCE_PATH_COMMAND
Reasonus: Convert the old zon mappings to the new ini mappings
Convert all the zon plugin mapping files from the old ReaSonus version to the new file structure
ID: REASONUS_CONVERT_PLUGIN_ZON_TO_INI
These actions are FaderPort 8/16 only
Reasonus: Show the ReaSonus Native 8/16 Control Panel
Toggle the ReaSonus Control Panel for the FaderPort 8/16. This action has a state, so should reflect its state in the button
ID: REASONUS_SHOW_REASONUS_8_CONTROL_WINDOW
Reasonus: Toggle disable plugins setting
If you use another controller for controlling the plugins, you can select this. The plugins mode is still active and you are still able to open the plugin window. From that point, the ReaSonus FaderPort will not do anything anymore for the plugins.
ID:_REASONUS_FP8_TOGGLE_DISABLE_PLUGINS
Reasonus: Toggle distraction free setting
Remove all that can be distracting like blinking buttons, some buttons `on` state.
ID: _REASONUS_FP8_TOGGLE_DISTRACTION_FREE_MODE
Reasonus: Toggle untouch last touched param after learn setting
When selected the last touched param will be set to untouched after parameter learn.
ID: _REASONUS_FP8_TOGGLE_UNTOUCH_LAST_TOUCHED_PARAM
Reasonus: Toggle master fader mode setting
When selected en pressing the master button will enable master fader mode. This makes the last track of the FaderPort control the master track.
ID: _REASONUS_FP8_TOGGLE_MASTER_FADER_MODE
Reasonus: Toggle swap shift buttons setting
This swaps the left and right Shift button.
ID: _REASONUS_FP8_TOGGLE_SWAP_SHIFT_BUTTONS
Reasonus: Toggle fader reset: Left shift and fader touch setting
When eneabled, you can use the [Left Shift] button to reset the fader value while touching the fader.
ID: _REASONUS_FP8_TOGGLE_FADER_RESET
Reasonus: Toggle momentary mute/solo setting
When set, it will make the Solo and Mute buttons momentary. The timeout for being momentary is 500 milli seconds. In short: If you press the solo button longer then 500ms and release it, it will instant unsolo again.
ID: _REASONUS_FP8_TOGGLE_MOMENTARY_MUTE_SOLO
Reasonus: Set the correct plugin type for the already created plugins
During development also an issue was found with not taking the plugin type in account. This can cause issues with the mapping as a VST and VST do not have the same mapping. This action helps you adding the proper type to the plugin mapping
ID: _REASONUS_FP8_TOGGLE_MOMENTARY_MUTE_SOLO
These actions are FaderPort v2 only
Reasonus: Show the ReaSonus Native V2 Control Panel
Toggle the ReaSonus Control Panel for the FaderPort v2. This action has a state, so should reflect its state in the button
ID: REASONUS_SHOW_REASONUS_V2_CONTROL_WINDOW
Reasonus: v2 Toggle control hidden tracks
Do not skip the hidden tracks when scrolling through te tracks
ID _REASONUS_FPV2_TOGGLE_CONTROL_HIDDEN_TRACKS
Reasonus: v2 Toggle disable fader move
This enables the option to disable the fader move when selecting another track. So no fader moves while doing other things in REAPER.
ID _REASONUS_FPV2_TOGGLE_DISABLE_FADER_MOVE
Reasonus: v2 Toggle endless track scroll
When on the last track and clicking the next button, go to the first track. Same for previous, but then the other way around.
ID _REASONUS_FPV2_TOGGLE_ENDLESS_TRACK_SCROLL
Reasonus: v2 Toggle momentary mute/solo setting
When set, it will make the Solo and Mute buttons momentary. The timeout for being momentary is 500 milli seconds. In short: If you press the solo button longer then 500ms and release it, it will instant unsolo again.
ID _REASONUS_FPV2_TOGGLE_MOMENTARY_MUTE_SOLO
How do I
Remove the old ReaSonus version
If you had the 'old' ReaSonus version installed, installing the new one will leave you with some artifacts. Within the Actions List there is a huge list of old ReaSonus actions that addde some of the logic. You do not need them anymore.
Step 1
First we will remove all the actions from the list. This can be done by going to the Reaper resource folder. Once in the folder:
- Search for
reaper-kb.iniand make a copy of it (just to be sure) - Open the file in your editor of choice
-
There will be a list of lines like
SCR 4 0 REASONUS_ALWAYS_ON "Reasonus: Always On" Reasonus/always-on.lua -
All the lines with
REASONUS_in it can be removed. Please take care not to remove other lines - Save your changes and step 1 is done
Step 2
Now we will remove all the actual files with th scripts
- In the Reaper resource folder is a folder named Scripts. Open this folder
- Inside this folder you'll see all scripts added by either yourself or other script makers
- Therer should be a folder named: Reasonus, and remove it
- We're done
When you now restart REAPER and go to the actions list all the old ReaSonus scripts should be gone.
Make a backup
It will never harm creating backups. If you make backups of your complete REAPER resource folder, you probably should be fine. But here the steps to create a backup and using a backed up version
Making a backup
-
Open the REAPER resource folder. In REAPER go to
Options>ShowREAPERresource path in Explorer/Finder. - In there you will find a folder named ReaSonus. In this folder are the filters, settings, localisation files and plugin mapping files located.
- Save a copy of the folder with all the content to a save place.
Using a backed up version
-
Open the REAPER resource folder. In REAPER go to
Options>Show REAPER resource path in Explorer/Finder. - You might want to backup the current files. See above how to.
- Remove/Rename the Reasonus folder
- Move the ReaSonus folder from the backup to the REAPER resource folder. (Be sure it is still named ReaSonus)
- Restart REAPER